Feature Description
The File Collection feature allows admins to create a collection of files and/or links that can be displayed via a File Collection Widget on any page on your site (Fig. 1). In additional to neatly organizing and displaying content within to end-users, File Collections also have robust reporting capabilities, allowing admins to see when items were accessed and by whom.
File Collection view for end-users

FIG 1- File Collection User View
Creating a File Collection
Creating a File Collection is a two-step process. The first step requires the creation of the File Collection and the second step requires adding the File Collection via a Widget to a page so that end-users can view and access it.
Step 1 - Creating the File Collection
1. From the Administrative Control Panel, navigate to Content Management > File Collections. This will bring you to the File Collections page where you can create a new File Collection and/or your listing of any already created File Collections, where you can edit and add items as needed.
2. To add a new file collection, click on the “Add New File Collection” button.
3. Enter a title for your File Collection in the Name field. Enter an optional description of your file collection. The description will appear at the top of the File Collection for end-users (Fig 2).
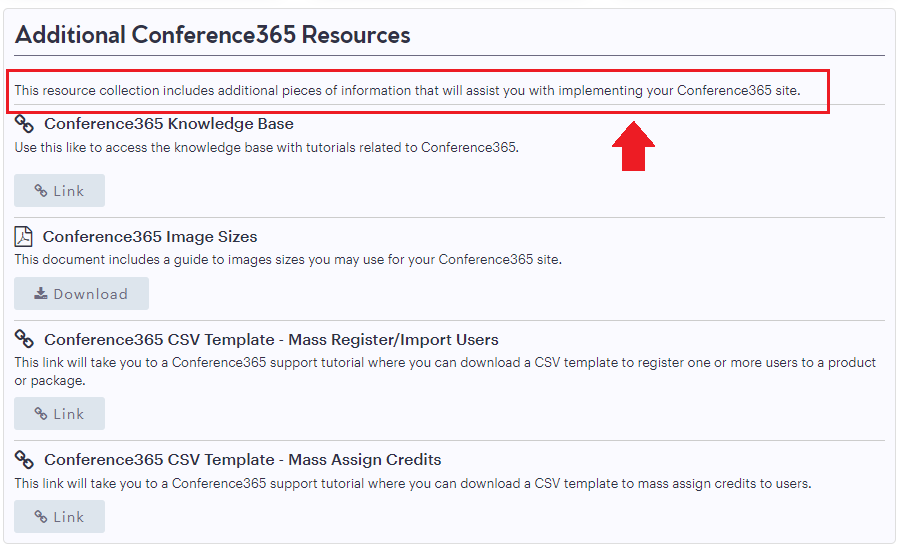
FIG 2- File Collection Description
4. Set the Permissions controlling who is able to view and access items within the File Collection (Fig. 3). By default, the "Default Permissions" options will be checked. When this option is selected, the default permissions will be used, allowing all user types and roles to be able to see and access the file collection, while guests (users that are not logged in) will only be able to see the content, and not access it. By unselecting this option, you will be prompted to select which user types and roles on your site can see and access the content within.

FIG 3- Permissions
5. After permissions have been set, click the "Save" option to return to your listing of File Collections or click the "Save and Add Items" button to begin adding items to your file collection. New items can be added to any File Collection at any time by clicking on the "Items" button from the File Collections page (Fig. 4).

FIG 4- Items Button
Adding Items to the File Collection
1. From within the File Collection items editor, click the "Create New Item" button.
2. Input the title for your File Collection item and select any applicable categories for this item using the "Categories" dropdown menu.
3. Enter an optional summary for your item using the WYSIWYG editor.
4. Select a publishing date by clicking on the date picker icon (Fig. 5).

FIG 5- Publishing Date
5. If you would like to include a thumbnail image for your item either drop the image into the "Drop File" area, choose an existing image, or choose a stock image.
6. Select the type of file from the "File Type" dropdown menu (Fig. 6). Additional completion fields will appear depending on the file type selected.

FIG 6- File Types
7. Choose whether your item should open for end-users in the same window/tab where the File Collection lives or whether you would like this to open in a new window/tab.
8. Depending on the file type selected above, you will be prompted to either upload your document, MP3, MP4, or add the external link.
9. Once you have added your item, click the "Save" button. This will return you to your File Collection items where you can continue to add additional items.
Step 2 - Adding the File Collection to a Page
1. Navigate to the page you would like to add the File Collection to. Pages can be accessed by navigating to Content Management > Pages.
2. Find the page you would like to add the File Collection to. If your site has many pages, you may use the Filter Pages functionality at the top of the page listing to find the specific page. Once you have found the page, click the Edit icon within the actions column to edit the page (Fig. 7).
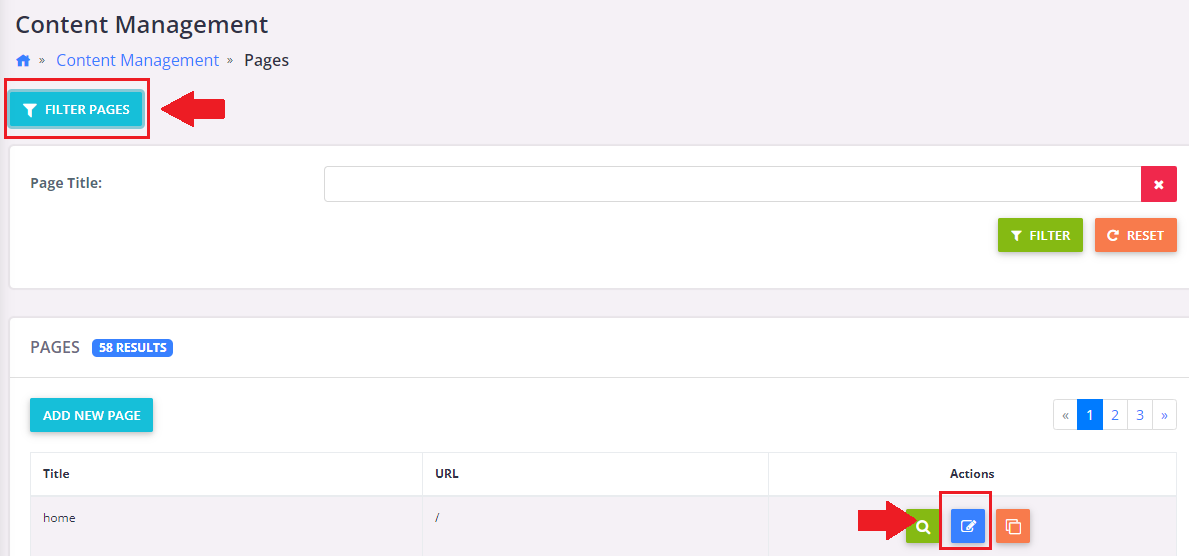
FIG 7- Filter
3. Click the "Add New Widget to Main Page Content" button to add the Widget to the page. Your pages are divided into 12 columns. So be sure you “size” your widget accordingly. If you want the widget to span across the entire page, give the “size” field a value of 12. If you want the widget to span across half of your page, give the “size” field a value of 6. Enter the number of rows that you want your widget to use. Keep in mind, the widget will auto-size the number of rows based on the content you have within it.
4. Enter a name for your widget and check the boxes to determine if you want to display the name on your page, give it a border, or hide it from mobile or desktop devices.
5. Select "File Collection" from the Type dropdown menu. Doing so will open an option for you to select the File Collection you would like to add. Select the File Collection you would like to add.
6. If you added thumbnail images to your File Collection during the initial set-up and would like those to display for end-users in the File Collection, click the checkbox labeled "Show File Collection Item Images."
7. Input the number of files/items you would like to display per page. If the File Collection has many resources, you may opt to limit the amount of items displayed at once. If you select the "Show Pagination" checkbox, end-users will be displayed with an option to advance through the pages.
8. Optionally select the checkbox giving end-users the ability to subscribe to an RSS Feed for this File Collection. When an end-user subscribes, they will then be notified when additional items are added to the File Collection.
9. If you would like to allow your end-users to search the File Collection, select where you would like the search form to display from the Search Form Visibility dropdown menu (Fig. 8).

FIG 8- Settings
10. Once you have entered the information you wish to click “Save.” This will return you to the page editor for the page you are editing. Click “Save and Stay” to save your changes.
Was this article helpful?
That’s Great!
Thank you for your feedback
Sorry! We couldn't be helpful
Thank you for your feedback
Feedback sent
We appreciate your effort and will try to fix the article