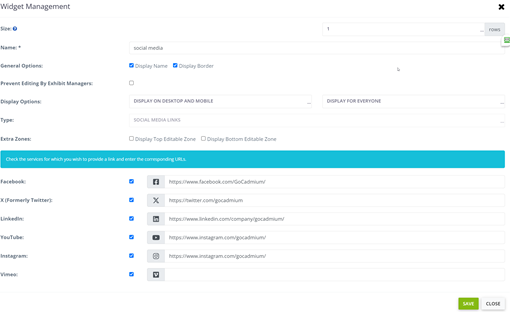
Vimeo and Instagram have been added as options in the Social Media Link widget type. Twitter has been renamed as "X (Formerly Twitter)" and the icon has been updated to match the new branding in the Social Media Links and Social Media Share widgets and on the Social Media tab in Products.
1. Navigate to Content Management > Pages and either create the new page you would like the widget to live on or click on the button to “Edit” an existing page.
2. Click on “Add new widget to main page content.” Your pages are divided into 12 columns. So be sure you “size” your widget accordingly. If you want the widget to span across the entire page, give the “size” field a value of 12. If you want the widget to span across half of your page, give the “size” field a value of 6. Enter the number of rows that you want your widget to use. Keep in mind, the widget will auto-size the number of rows based on the content you have within it.
3. Enter a name for your widget and check the boxes to determine if you want to display the name on your page, give it a border, or hide it from mobile devices.
4. Choose Social Media Share for the widget type.
5. Enter the text that you would like to pre-populate when a user clicks the option to share on social media, then select which social media sites you would like the user to be able to share to.
6. Once you have entered the information you wish to click “Save.” This will return you to the page editor for the page you are editing. Click Save and Stay to save your changes.
Last modified May 17, 2024
Was this article helpful?
That’s Great!
Thank you for your feedback
Sorry! We couldn't be helpful
Thank you for your feedback
Feedback sent
We appreciate your effort and will try to fix the article