*This tool will allow you to mass create multiple products and import basic information for each. This tool does not mass import components.
If you do not set pricing, the products will default to "Private". All products will be in Draft status after you import. Once all products have been created, you will need to add Components to them.
To begin, follow these steps:
1. Open an Excel worksheet and enter the column header names EXACTLY as shown below, in the first row:
title, summary, description, start_sales_at, end_sales_at, categories, product_types, social, remote_product_id, remote_accounting_code, accounting_date
Field Descriptions
- title, summary, and description: Text fields.
- start_sales_at and end_sales_at: are dates in ISO date format (YYYY-MM-DD). Enter "never" in the end_sales at field if you do not have a sales end date.
- categories: is a comma-separated list of category names. Categories must match (case-sensitive) already existing Categories. This is an optional field.
- product_types: is a comma-separated list of product types. Product types must match (case-sensitive) already existing product types. This is an optional field.
- social: is a comma-separated list of social media options (Facebook, LinkedIn, Twitter, Google, Pinterest). Social entries are case-sensitive.
- Enter "All" to turn on all social media options. This is an optional field.
- remote_product_id: Alpha-Numeric field. This is an optional field.
- remote_accounting_code: Numeric field. Must match existing Remote Accounting Code(s). This is an optional field.
- accounting_date: An date in ISO date format (YYYY-MM-DD). This is an optional field.
Enter the corresponding field values in the rows below each column header for EACH new product. For example, enter your first Product Title in the cell below the "title" column. Each row below your column header row represents one Product.
2. After entering all of the field values for each Product, save your Excel file as a CSV (Comma Delimited) (*.csv).
3. Browse to select your saved CSV file for uploading.
4. Check the box next to "Set prices for ALL these products". This will set the same price for ALL of your imported files. You may leave this blank if your product prices are different and in which case, you will need to enter the price for each after the import has been completed.
5. Click "Import and Review".
6. Review your products on the next page, then click "Create Products", or "Go Back" to start over.
7. Once your import is complete, be sure to create/add components and add/edit tabs for each product that was imported and change the status when ready.
New option to include the remote registration URL field for import during the mass product import workflow. This field is used for customers who are selling their products in a 3rd party system that utilizes the Elevate Registration API methods to send orders to Elevate for fulfillment. The Remote Registration URL will be linked from the Register button on the product page.
Additionally, the remote registration URL field has been added to our Data API for 3rd parties to pull.
**If you are interested in more information about utilizing a 3rd party system to take orders, please reach out to elevate-support@gocadmium.com**
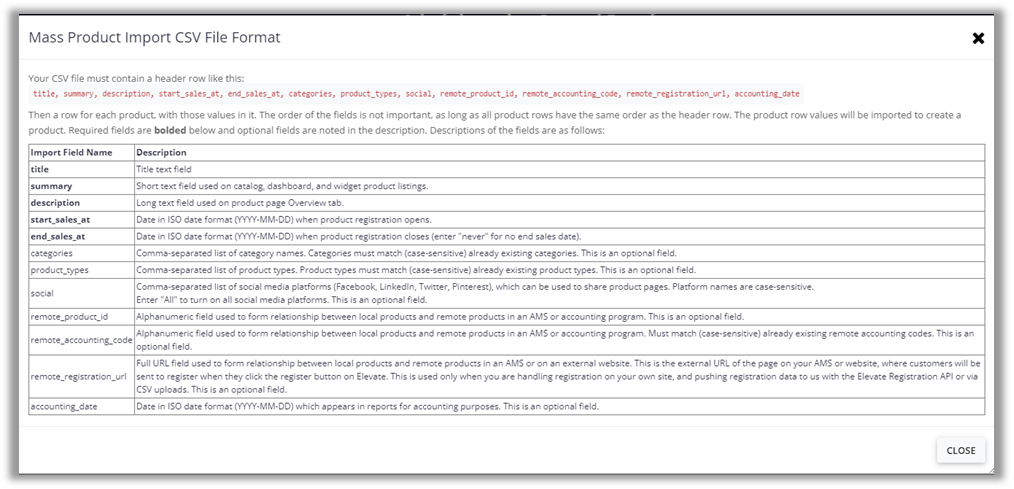
Fig. 1 - Mass Product Import CSV File Format
Was this article helpful?
That’s Great!
Thank you for your feedback
Sorry! We couldn't be helpful
Thank you for your feedback
Feedback sent
We appreciate your effort and will try to fix the article